Documentation
Are you ready to use a single, simple and powerfull image api
Usage
Getting Started
Welcome to imageus developer documentation,
With imageus, you can make your web, mobile or similar application high performance in minutes.
Thanks to its powerful API support, it can optimize your images according to the areas you will use without writing a single line of code. Thus, you can concentrate only on your business model without worrying about the visuals in your projects.
If you haven't created an imageus account yet, you can create one here and test the powerful infrastructure of imageus for 7 days free of charge.
Set-up Your Account
If you have not created an imageus account yet, create your account first.
You can register here to create your account, or if you have an existing account, you can use it to log in.
After creating your account, your 7 dasys free-trial subscription will be started automatically.
After you create your account, go to the main page where your images are hosted in your account from the sources section, add any domain address to sources and that's it
You are ready to use!
Image Sources
Web Proxy
Do you need an optimization for your static images on your website?
For example;
Lets say you own https://imageus.dev and you want to provide performance to your website using APIs of imageus.
After signin in to you account, go to the Sources section and add your domain as image source. Remember, you only need to add the domain name. You don't have to specify scheme names (like http:// or https://) or www. prefix. domainname.com is enough.
After adding your image source to your account, the relevant source will be synced to imageus servers around the world in about 10 seconds.
You are now ready! Using imageus APIs, you can optimize the image sources on your website so we can start serve it to your users!
Amazon S3
Do you need an optimization for your static images on Amazon S3?
For example;
Lets say you own https://imageus.s3.eu-central-1.amazonaws.com bucket and you want to provide performance to your website using APIs of imageus.
After signin in to you account, go to the Sources section and add your domain as image source. Remember, you only need to add the domain name. You don't have to specify scheme names (like http:// or https://) or www. prefix. imageus.s3.eu-central-1.amazonaws.com is enough.
After adding your image source to your account, the relevant source will be synced to imageus servers around the world in about 10 seconds.
You are now ready! Using imageus APIs, you can optimize the image sources on your website so we can start serve it to your users!
Microsoft Azure
Do you need an optimization for your static images on Microsoft Azure?
For example;
Lets say you own https://imageus.blog.core.windows.net blob storage and you want to provide performance to your website using APIs of imageus.
After signin in to you account, go to the Sources section and add your domain as image source. Remember, you only need to add the domain name. You don't have to specify scheme names (like http:// or https://) or www. prefix. imageus.blog.core.windows.net is enough.
After adding your image source to your account, the relevant source will be synced to imageus servers around the world in about 10 seconds.
You are now ready! Using imageus APIs, you can optimize the image sources on your website so we can start serve it to your users!
Google Cloud Storage
Do you need an optimization for your static images on Google Cloud Storage?
For example;
Lets say you own https://imageus.storage.googleapis.com storage and you want to provide performance to your website using APIs of imageus.
After signin in to you account, go to the Sources section and add your domain as image source. Remember, you only need to add the domain name. You don't have to specify scheme names (like http:// or https://) or www. prefix. imageus.storage.googleapis.com is enough.
After adding your image source to your account, the relevant source will be synced to imageus servers around the world in about 10 seconds.
You are now ready! Using imageus APIs, you can optimize the image sources on your website so we can start serve it to your users!
Digital Ocean Spaces
Do you need an optimization for your static images on Digital Ocean Spaces?
For example;
Lets say you own https://imageus.spaces.digitalocean.com storage and you want to provide performance to your website using APIs of imageus.
After signin in to you account, go to the Sources section and add your domain as image source. Remember, you only need to add the domain name. You don't have to specify scheme names (like http:// or https://) or www. prefix. imageus.spaces.digitalocean.com is enough.
After adding your image source to your account, the relevant source will be synced to imageus servers around the world in about 10 seconds.
You are now ready! Using imageus APIs, you can optimize the image sources on your website so we can start serve it to your users!
Image Operations
Resizing Images
One of the simplest operations on images is to cutting it to a certain width and length.
Width
You can use the width parameter to cut an image just by its width.

Height
You can use the height parameter to cut an image just by its height.

Width & Height
You can combine both width and height parameter to cut an image by its width and height.

Width
You can use the width parameter to cut an image just by its width.

Height
You can use the height parameter to cut an image just by its height.

Width & Height
You can combine both width and height parameter to cut an image by its width and height.

Crop Modes
One of the simplest operations on images is to cutting it to a certain width and length.
Cover
Cover mode is defined as the default crop mode, if you don't specify any mode when you use the width and height parameters, your images will be cropped by default with cover mode.

Cover with position
When using the default cover mode, you can additionally specify the position of the cropping focus, this position works in the center mode by default and bases your image as the focus point in the middle. Below you can see other available positions and usage examples.
center (default) : Cropping by focusing on the central part of the image.
top : Cropping by focusing on the top part of the image.
bottom : Cropping by focusing on the bottom part of the image.
left : Cropping by focusing on the left part of the image.
right : Cropping by focusing on the right part of the image.
You can also use it by giving dual values. For example;
right top :Cropping by focusing on the right top part of the image.
left top : Cropping by focusing on the left top part of the image.
right bottom : Cropping by focusing on the right bottom part of the image.
left bottom : Cropping by focusing on the left bottom part of the image.




Contain
By preserving the aspect ratio, it fits the image to another image in the dimensions you provide, ideal for areas of use such as company logo.

Contain with Background
You can also add a background parameter for gaps that may occur on the sides and top of the image in the use of Contain mod. Thus, the background color will be filled automatically with the color you specify for the remaining parts.

Fill
Resizes in the dimensions you give, ignoring the aspect ratio

Inside
Keeping the aspect ratio, resize the image to be as large as possible while ensuring that its dimensions equal to or smaller than both specified.

Outside
Keeping the aspect ratio, resize the image to be as small as possible while ensuring that its dimensions are equal to or larger than both specified.

Extract
When cropping the image you have given in the relevant dimensions, choose which direction to focus and which part to crop to what extent. This parameter can only work with other modes, for an image to be extracted, cover, contain etc. mode and aspect information must be given.
It works as left,top,width,height.
For example; Assuming that we give the values of 10,0,200,100, after moving 10 pixels away from the left on the image we are processing, imageus will crop the distance from the rest of the image by 200 pixels horizontally and 100 pixels vertically. Therefore, Imageus will give an visual output of 200x100 pixels.
The point to be noted here is that the width and height value you give in the extract should not be less than the width and height value you give to the image. Otherwise, the transform operation of your image will get an error as there will not be enough space to crop.

Cover
Cover mode is defined as the default crop mode, if you don't specify any mode when you use the width and height parameters, your images will be cropped by default with cover mode.

Cover with position
When using the default cover mode, you can additionally specify the position of the cropping focus, this position works in the center mode by default and bases your image as the focus point in the middle. Below you can see other available positions and usage examples.
center (default) : Cropping by focusing on the central part of the image.
top : Cropping by focusing on the top part of the image.
bottom : Cropping by focusing on the bottom part of the image.
left : Cropping by focusing on the left part of the image.
right : Cropping by focusing on the right part of the image.
You can also use it by giving dual values. For example;
right top :Cropping by focusing on the right top part of the image.
left top : Cropping by focusing on the left top part of the image.
right bottom : Cropping by focusing on the right bottom part of the image.
left bottom : Cropping by focusing on the left bottom part of the image.


Contain
By preserving the aspect ratio, it fits the image to another image in the dimensions you provide, ideal for areas of use such as company logo.

Contain with Background
You can also add a background parameter for gaps that may occur on the sides and top of the image in the use of Contain mod. Thus, the background color will be filled automatically with the color you specify for the remaining parts.

Fill
Resizes in the dimensions you give, ignoring the aspect ratio

Inside
Keeping the aspect ratio, resize the image to be as large as possible while ensuring that its dimensions equal to or smaller than both specified.

Outside
Keeping the aspect ratio, resize the image to be as small as possible while ensuring that its dimensions are equal to or larger than both specified.

Extract
When cropping the image you have given in the relevant dimensions, choose which direction to focus and which part to crop to what extent. This parameter can only work with other modes, for an image to be extracted, cover, contain etc. mode and aspect information must be given.
It works as left,top,width,height.
For example; Assuming that we give the values of 10,0,200,100, after moving 10 pixels away from the left on the image we are processing, imageus will crop the distance from the rest of the image by 200 pixels horizontally and 100 pixels vertically. Therefore, Imageus will give an visual output of 200x100 pixels.
The point to be noted here is that the width and height value you give in the extract should not be less than the width and height value you give to the image. Otherwise, the transform operation of your image will get an error as there will not be enough space to crop.

Image Rotation
It allows you to instantly rotate your images vertically or horizontally or with a certain degree.
Mirroring Vertically
It allows you to mirror vertically while cropping the image you have given in the relevant dimensions. It can take two values, 1 and 0. Flip and flop values can be used together at the same time.
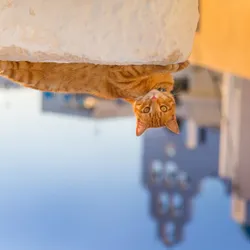
Mirroring Horizontally
It allows you to mirror horizontally while cropping the image you have given in the relevant dimensions. It can take two values, 1 and 0. Flip and flop values can be used together at the same time.

Rotation
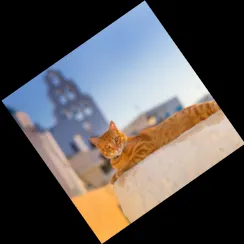
It allows you to rotate the image you give in 360 degrees angular plane on the 2-dimensional surface while cropping it in the relevant dimensions. It works by taking a numeric value between 0 and 360, 360 is the default value because it has returned to the starting point angularly.
In the example below, a picture cropped as 175x175 pixels is requested to be rotated 125 degrees and added black color to its background, so the output image will be larger than 175 pixels in width or height.
Mirroring Vertically
It allows you to mirror vertically while cropping the image you have given in the relevant dimensions. It can take two values, 1 and 0. Flip and flop values can be used together at the same time.

Mirroring Horizontally
It allows you to mirror horizontally while cropping the image you have given in the relevant dimensions. It can take two values, 1 and 0. Flip and flop values can be used together at the same time.

Rotation
It allows you to rotate the image you give in 360 degrees angular plane on the 2-dimensional surface while cropping it in the relevant dimensions. It works by taking a numeric value between 0 and 360, 360 is the default value because it has returned to the starting point angularly.
In the example below, a picture cropped as 175x175 pixels is requested to be rotated 125 degrees and added black color to its background, so the output image will be larger than 175 pixels in width or height.

Face Focus
Face focus feature instantly recognizes human faces in your images and takes them as the focus point.
You can use it especially for usage areas such as profile photo etc.
Extract Faces
You can use it with only one parameter.

Extract Faces
You can use it with only one parameter.

Watermark
You can add watermarks to your images with "overlay" parameter also you can specify watermark location with "gravity" parameter
Please make sure that your overlay image size is not bigger than your origin image.




Html to pdf
About
The imageus pdf service will automatically generate pdf file from your html page.
Generated pdf will not be cached and every request accepted as 1 transformation
Using with GET
You can alse change your pdf file with and height values with pageSize parameter. Page size is optional parameter and default value is A4 size
Using with HTTP GET
Using with HTTP POST
Filters
Grayscale
You can use this effect to convert images to black and white. It works by taking a numerical value of 0 (passive) and 1 (active).


Blur
You can use it to apply blur effect on the image. It works by taking a numerical value between 0 and 100.




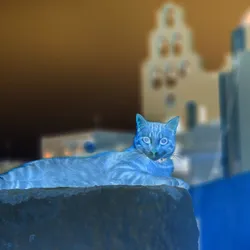
Negate (Negative)
You can use this effect to transform images negatively. It works by taking a numeric value, 0 (passive) and 1 (active).

Brightness
You can use this effect to change the light balance of images. It works by taking a decimal value between 1.0 and 100.0.


Gamma
You can use this effect to change the gamma balance of images. It works by taking a decimal value between 1.0 and 3.0.


Hue
You can use this effect to change the color balance of images. Converts the color values on the image with angular degrees on the Hue color wheel corresponds to 0 red tones, 120 green tones, and 240 blue tones. It works by taking a numeric value between 0 and 360. 360 is the default value since it has angularly returned to the starting point.


Tint
Tint the image using the provided chroma while preserving the image luminance. An alpha channel may be present and will be unchanged by the operation.



Extend
Extend / pad / extrude one or more edges of the image with either the provided background colour or pixels derived from the image. This operation will always occur after resizing and extraction, if any.
Top: How many pixels should be add to top.
Right: How many pixels should be add to right.
Bottom: How many pixels should be add to bottom.
Left: How many pixels should be add to left.
Extend with: background,copy,repeat,mirror.
Background: Usable with 'background' option, if you want to use other options you should set background to "000000".



Integrations
Wordpress
The imageus wordpress plugin will automatically imageus CDN on all of your existing images.
You can also customize the way we generate the URLs by using custom attributes of imageus on your img tags.
You can reach imageus wordpress plugin by clicking here. You can also visit plugin github page by clicking here.
How to install?
Via wordpress dashboard
- Go to your wordpress dashboard
- Go to plugins page and add a new plugin
- Search imageus and click to install
- Ready to go!
Via zip upload
- Download the plugin via link imageus wordress.
- Upload zip file to your wordpress plugins page (Plugins => New => Upload)
- Activate the plugin from plugins page.
- Complete the settings in plugin page.
- Ready to go!
Plugins
Nuget
By using the imageus nuget plugin for your .net projects, you can quickly integrate the imageus on your websites or on your api end points.
to view the latest version information of nuget plugin, click here
How to install?
Via nuget package manager
- Install-Package Imageus -Version 1.0.0
- Ready to go!
Via .NET CLI
- dotnet add package Imageus --version 1.0.0
- Ready to go!
Via PackageReference for .csproj files
- <PackageReference Include="Imageus" Version="1.0.0" //>
- Ready to go!
After installation
If you wish, you can specify your base address with SetWebsiteBaseUrl("yourdomain.com") in the startup file of your MVC projects. After doing this process, you will not need to give a base src for uses in other methods.
Settings
Webp Support
Imageus gives the outputs of the given images as default in WebP format, the most suitable technique for current internet technologies is to use webp for now. It works by taking a numerical value of 0 (passive) and 1 (active).
Moreover, it automatically detects whether the browser on which the image is requested has webp support, and automatically turns off this feature in browsers that don't support webp.
But if you still don't want to use webp, you can also turn off webp support manually.When the Webp feature is turned off, the original format of the image will be used automatically.
What is webp?
WebP is an image format that uses both lossy and lossless compression. It was developed based on technology currently held by Google, acquired by Google's acquisition of On2 Technologies. As a derivative of the VP8 video format, it is a side project to the WebM multimedia container format.
Turning off Webp support is not recommended. Especially for use in the web.
In the example below, you can see the sizing difference between the 2 images with and without webp support.
 With Webp
4.6 KB
 Without Webp
7.5 KB
Turning off Webp support is not recommended. Especially for use in the web.
In the example below, you can see the sizing difference between the 2 images with and without webp support.
 With Webp
4.6 KB
 Without Webp
7.5 KB
Other
SEO (Search Engine Optimization)
Read on to understand how the Imageus handles SEO.
How it works?
We are aware that when you use Imageus, the URL of your images is now shown via the imageus.dev domain instead of you. To help search bots like Google know that your images are not in the imageus.dev domain, we add an HTTP response header so Google can follow the canonical URL of your images.
An example for the image url below:
HTTP Header information will be similar to the following:
The link part actually specifies that this image is belongs to yoursite.com and not imageus.dev.
CDN (Content Delivery Network)
Once your image is created, we use a two-tier CDN to maximize speed and reduce latency.
One of the biggest mistakes when launching new and online products is when people don't realize that the web is available all over the world.
You have leads everywhere accessing your product, so having your images (and assets in general) close to customers can speed up your page load speed, and speed is closely linked to more sales.
Security
Imageus needs predefined domain names to process your images. It behaves as a secure proxy for your images.
After you create your account, you need to add your main source, where your images are hosted, to your account.
After registering here to create an account, you can go to here to add a new source to your account.
Support
If you have any questions, you can contact with our 24/7 Live Support or contact via support@imageus.dev. We will try to get back to you as soon as possible.

